Rasterise views and partials to images by simply adding a tag and fetching the URL. Automatic routing, scaling, caching, protection and preview mode. Zero configuration (unless you need it).
Installation
Run the following command from your project root:
composer require jacksleight/statamic-rasterThis package uses Puppeteer via spatie/browsershot under the hood, you will also need follow the necessary Puppeteer installation steps for your system. I can't help with Puppeteer issues or rendering inconsistencies, sorry.
If you need to customise the config you can publish it with:
php artisan vendor:publish --tag="statamic-raster-config"Usage
Layout Setup
The views will be rendered inside a layout view where you can load any required CSS and other assets. By default this is raster, but you can change it in the config file.
{{# resources/views/raster.antlers.html #}}<!DOCTYPE html><html> <head> <meta charset="utf-8"> <meta name="viewport" content="width=device-width, initial-scale=1"> <title>Raster</title> {{ vite src="resources/css/app.css" }} </head> <body class="bg-black text-white"> {{ $template_content }} </body></html>Automatic Mode
To make a view rasterizeable simply implement the main raster tag and then generate a URL to your image using the raster:url tag.
{{# resources/views/blog/hero.antlers.html #}}{{ %raster width="1000"}}<div> <svg>...</svg> <h1>{{ $post:title }}</h1> <p>{{ $post:date }}</p></div>{{# resources/views/blog/show.antlers.html #}}{{ push:head }} <meta property="og:image" content="{{ raster:blog/hero }}">{{ /push:head }}The current content will be detected automatically and its data passed to the view. You can override this by adding a :content="entry_id" attribute to the URL tag.
You can set options with the main tag or through the URL with URL tag. The options passed in the URL take priority over options set in the main tag.
When the view is rendered during normal non-raster requests the tag does nothing.
🚨 Important: Views rasterised using automatic mode must implement the raster tag.
Manual Mode
If you would like more control over the routing and how the requests are handled you can define your own routes that return raster responses and then generate a URL to your image using the usual route tag.
{{# resources/views/blog/hero.antlers.html #}}<div> <svg>...</svg> <h1>{{ $post:title }}</h1> <p>{{ $post:date }}</p></div>/* routes/web.php */use JackSleight\StatamicRaster\Raster;use Statamic\Facades\Entry; Route::get('/blog/{entry}/hero', function (Request $request, $entry) { return Raster::make('blog.hero') ->content(Entry::find($entry)) ->width(1000);})->name('blog.hero');{{# resources/views/layout.antlers.html #}}<meta property="og:image" content="{{ route:blog.hero :entry="id" }}">🚨 Important: Views rasterised using manual mode must not implement the raster tag.
Customising Rasterised Views
If you would like to make changes to the view based on whether or not it's being rasterised you can check for the $raster variable:
<div {{ [ 'rounded-none' => $raster,] | classes }}></div>Options
The following options can be set with the main tag or URL tag:
- width (int)
Width of the generated image. - height (int, auto)
Height of the generated image. - basis (int)
Viewport basis of the generated image. - scale (int, 1)
Scale factor of the generated image. - type (string, png)
Type of the generated image (png,jpegorpdf). - file (string)
File name of the response, excluding extension. - content (string)
ID of the entry data to pass to the view. - data (array)
Array of data to pass to the view. - preview (bool, false)
Enable preview mode.
With PDF output a height is required, it will only contain one page, and dimensions are still pixels not mm/inches. If you're looking to generate actual documents from views I highly recommend checking out spatie/laravel-pdf.
Caching
The following caching options can be set with the main tag or by chaining methods on to the object. The cache_id cannot be passed as a URL parameter. You can globally disable caching by setting the RASTER_CACHE_ENABLED env var to false. By default the cache will be stored locally in storage/app/raster, you can change this by setting the RASTER_CACHE_DISK and RASTER_CACHE_PATH env vars.
- cache (bool, false)
Enable caching of generated images. - cache_id (string, '_')
Cache identifier (optional, see below).
File paths will use this pattern: [cache_path]/[view_name]/[cache_id]/[params_hash].[extension].
Viewport Basis
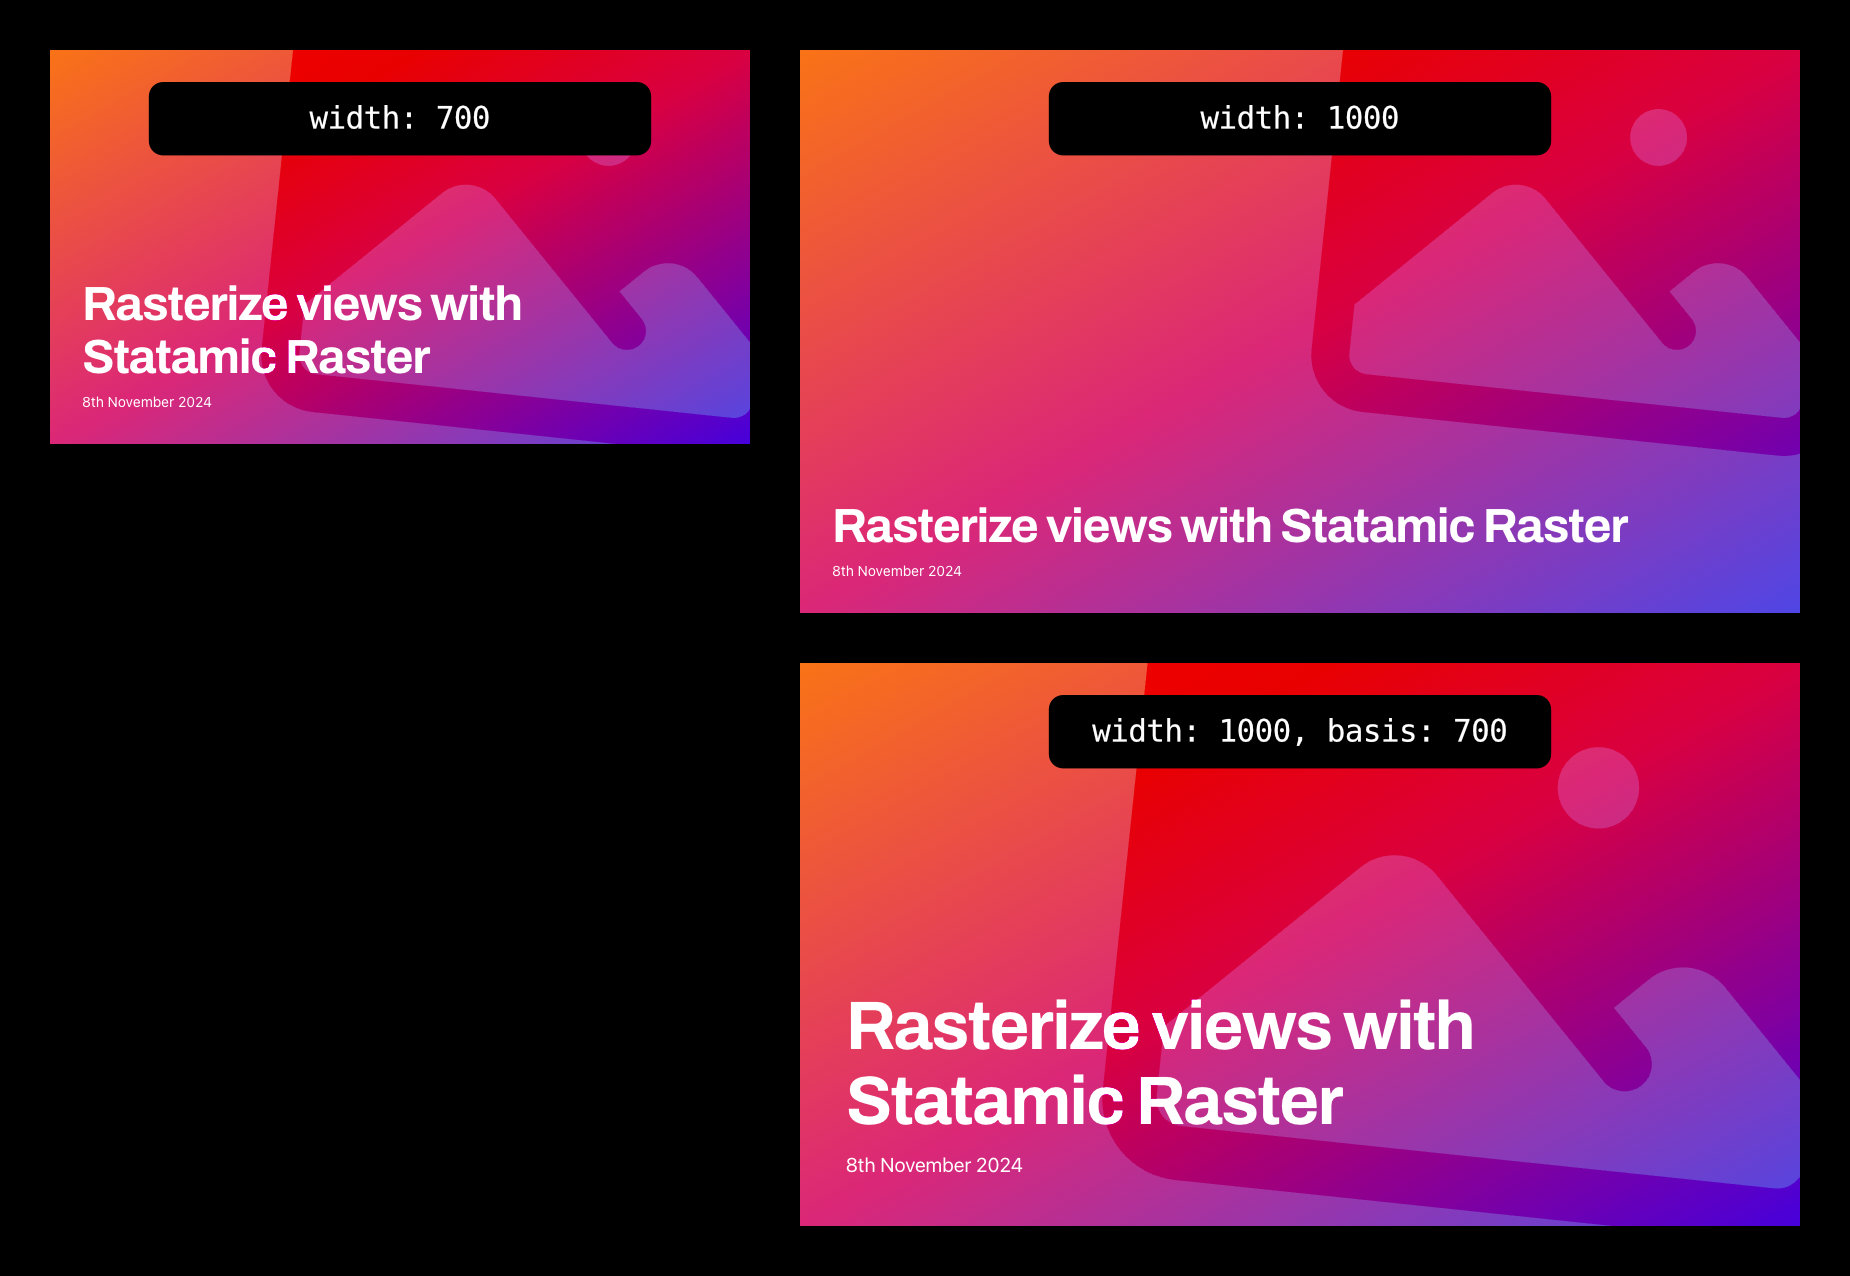
When the basis option is set the image will be generated as if the viewport was that width, but the final image will match the desired width. Here's an example of how that affects output:
Preview Mode
In preview mode the HTML will be returned from the response but with all the appropriate scaling applied. This gives you a 1:1 preview without the latency that comes from generating the actual image.
Live Preview
To add a rasterised view to Statamic's live preview add an additional preview target to the collection config with the following URL. If you need to adjust the preview you can add additional options as query parameters.
/!/raster/your.view.nameSecurity & URL Signing
Only views that implement the raster tag can be rasterised in automatic mode, an error will be thrown before execution if they don't. It's also recommended to enable URL signing on production to ensure they can't be tampered with. You can do this by setting the RASTER_SIGN_URLS .env var to true.
Customising Browsershot
If you need to customise the Browsershot instance you can pass a closure to Raster::browsershot() in a service provider:
use JackSleight\StatamicRaster\Raster; Raster::browsershot(fn ($browsershot) => $browsershot ->setOption('args', ['--disable-web-security']) ->waitUntilNetworkIdle());Sponsoring
This addon is completely free to use. However fixing bugs, adding features and helping users takes time and effort. If you find this useful and would like to support its development any contribution would be greatly appreciated. Thanks! 🙂
