
 Duncan McClean
#Installation
-
Require Cookie Notice as a Composer dependency:
composer require duncanmcclean/cookie-notice -
Publish the addon's configuration file:
php artisan vendor:publish --tag=cookie-notice-config -
Add the Cookie Notice tags to your layout(s). Make sure the
{{ cookie_notice:scripts }}tag is in the<head>and the{{ cookie_notice:widget }}tag is near the top of the<body>:<!doctype html><html><head><!-- Add this... -->{{ cookie_notice:scripts }}</head><body><!-- And this... -->{{ cookie_notice:widget }}</body></html> -
That's it installed! You can now configure the consent groups and customize the widget.
#Configuring Consent Groups
By default, Cookie Notice ships with two consent groups: Necessary & Analytics. However, you should consider your own use and tweak the consent groups to suit the requirements of your site.
You can customize the consent groups in the config/cookie-notice.php config file.
'consent_groups' => [ [ 'name' => 'Necessary', 'handle' => 'necessary', 'enable_by_default' => true, 'checkbox_disabled' => true, ], [ 'name' => 'Analytics', 'handle' => 'analytics', 'description' => 'These cookies are used to provide us with analytics on which content visitors read, etc.', 'enable_by_default' => false, ],],For each consent group, you can provide the following options:
name- This name will be displayed to the user.handle- The handle will be used as a unique identifier for this consent group.description- Optional. The description will be displayed alongside the group's name.enable_by_default- Optional. Determines whether the consent group will be enabled by default when users first visit your site. They'll still be able to disable the consent group if they wish.checkbox_disabled- Optional. Prevents users from toggling the consent group's checkbox. The consent group will always be consented to, which is useful for strictly necessary cookies.
#Managing Scripts
There's a couple of different ways you can manage scripts with the Cookie Notice addon.
#Via the Control Panel
This is likely the easiest way to manage scripts, since you (& your clients) can do it without needing to touch any code. You can access the "Manage Scripts" page in the Control Panel, under the "Utilities" section.
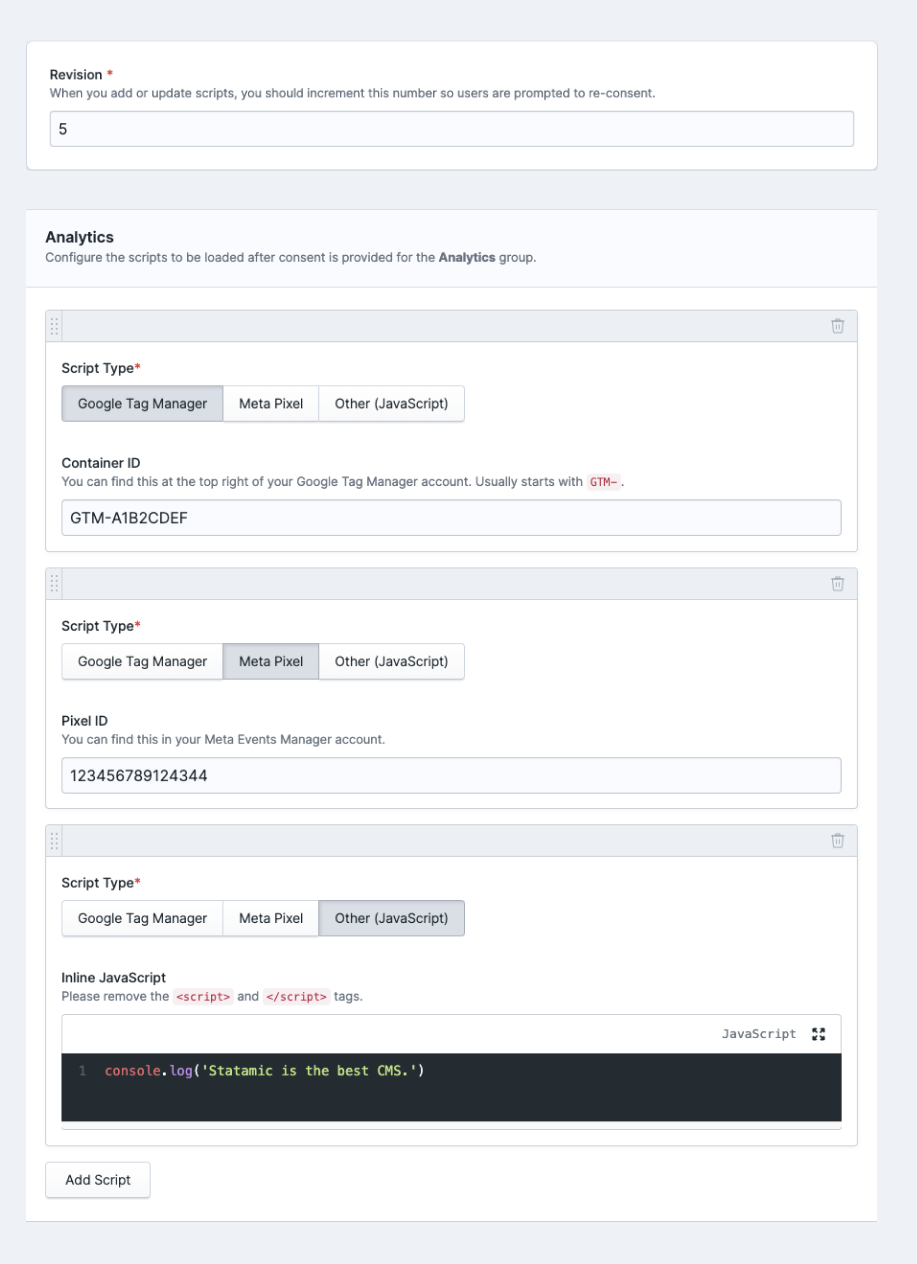
From the "Manage Scripts" page, you can configure the scripts to be loaded for each of the configured consent groups. For ease of use, Google Tag Manager & Meta Pixels can be added by simply providing the container ID or pixel ID.
You can also configure the "Revision" of your scripts. This is particularly useful if you want to ensure users provide re-consent when you add new scripts.
Permissions
To access the "Manage Scripts" page, users will need the manage scripts permission.
#Via code
The recommended way to load JavaScript based on the user's consent is by adding type="text/plain" data-consent-group="analytics" to any <script> tags:
<script type="text/plain" data-consent-group="analytics"> console.log('Running some analytics code...')</script>This will ensure that the script is only executed when the user provides consent for the analytics consent group.
#Events
If you need to run some specific JavaScript when the user provides or removes consent, you can listen for the accepted and declined events:
window.CookieNotice.on('accepted', (consentGroup) => { if (consentGroup === 'analytics') { console.log('Running some analytics code...') }}) window.CookieNotice.on('declined', (consentGroup) => { if (consentGroup === 'analytics') { console.log('Un-running some analytics code...') }})You may also listen for the preferences_updated event, which is dispatched whenever the user updates any of their consent preferences:
window.CookieNotice.on('preferences_updated', (preferences) => { console.log('The user updated some preference...', preferences);})Make sure your JavaScript is after the
{{ cookie_notice:scripts }}tag, otherwise thewindow.CookieNoticeobject won't be available.
#Example: Loading embeds based on consent (Alpine.js)
For example, you may only want to load a YouTube embed when the user provides consent for the marketing consent group. You can take advantage of the accepted and declined events to do this:
<script> document.addEventListener('alpine:init', () => { Alpine.data('CookieConsentHandler', () => ({ showVideo: false, init() { window.CookieNotice.on('accepted', (consentGroup) => { if (consentGroup === 'marketing') { this.showVideo = true; } }) window.CookieNotice.on('declined', (consentGroup) => { if (consentGroup === 'marketing') { this.showVideo = false; } }) }, })); });</script> <div x-data="CookieConsentHandler"> <template x-if="showVideo"> <iframe width="560" height="315" src="https://www.youtube.com/embed/dQw4w9WgXcQ" title="YouTube video player" frameborder="0" allow="accelerometer; autoplay; clipboard-write; encrypted-media; gyroscope; picture-in-picture; web-share" referrerpolicy="strict-origin-when-cross-origin" allowfullscreen></iframe> </template> <template x-if="!showVideo"> <p>Consent not given for marketing cookies. Video cannot be loaded.</p> </template></div>#Consent Widget
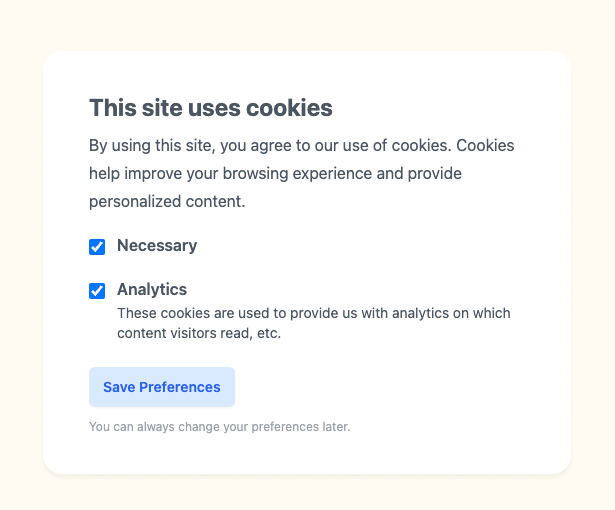
Cookie Notice ships with a minimal consent widget, allowing your users to easily accept or decline the configured consent groups.
#Building a custom widget
If you'd prefer to build your own consent widget, to gain more control over the appearance, you can. Follow these steps:
- Create a new view in your
resources/viewsdirectory. For example,resources/views/components/cookie-notice.antlers.html. - In your
cookie-notice.phpconfig file, update thewidget_viewoption to point to your new view:'widget_view' => 'components.cookie-notice', - Next, copy this boilerplate into your new view:
<!-- Start of Cookie Notice Widget --><div id="cookie-notice" class="relative z-[999]" style="display: none"><div class="fixed bottom-6 right-6 bg-white p-6 sm:mx-auto sm:max-w-lg"><h2>This site uses cookies</h2><ul>{{ consent_groups }}<li><label for="group-{{ handle }}"><input type="checkbox" id="group-{{ handle }}" name="group-{{ handle }}" class="w-4 h-4">{{ name }}{{ if description }}<span>{{ description }}</span>{{ /if }}</label></li>{{ /consent_groups }}</ul><button type="button" data-save-preferences>Save Preferences</button></div></div><script>document.addEventListener('DOMContentLoaded', () => {window.CookieNotice.boot(document.getElementById('cookie-notice'),JSON.parse('{{ config | to_json }}'));});</script><!-- End of Cookie Notice Widget -->
- You can loop through each of the consent groups using the
{{ consent_groups }}tag pair. - You can boot Cookie Notice's JavaScript by calling the
window.CookieNotice.boot()method after the DOM has loaded. The first argument should be the root element of your widget, and the second argument should be the config object, which you can pass in using{{ config | to_json }}. - For each consent group, you need have a
group-{{ handle }}input. - On the button, you need the
data-save-preferencesattribute so Cookie Notice can listen toclickevents.
- You can loop through each of the consent groups using the
- Start customizing!
#Adding an "Update Preferences" button
After users provide consent when they first visit your site, they may wish to update their preferences at a later late. To make this possible, you should add an "Update Preferences" button somewhere on your site that'll re-open the consent widget.
You can place this button wherever you like - you just need to add the data-show-cookie-notice-widget attribute to the element:
<button data-show-cookie-notice-widget>Update cookie consent</button>#Multi-Site
Out of the box, all sites will share the same scripts.
If you'd rather configure scripts on a per-site basis instead, you may disable the configure_scripts_per_site option in your config file. You'll then be able to switch between sites in the Control Panel to manage their scripts.
// config/cookie-notice.php 'configure_scripts_per_site' => true,#Translating
If your site uses a language other than English, you'll probably want to translate the "strings" in the Consent Widget and in the Control Panel. To do this, you'll need to create a JSON translations file:
- If you don't already have one, create a
langdirectory in the root of your project. - Create a
{locale}.jsonfile in thelangdirectory. Replace{locale}with your locale. - In the JSON file, you may add key / value pairs for each of the strings you wish to translate:
// lang/de.json { "Accept": "Annehmen"}#Upgrading from v8.x to v9.x
In version 9, Cookie Notice has been completely overhauled, with a big focus on making it easier to manage third-party scripts and more flexibility for developers around customizing the consent widget.
To upgrade to v9.x, you'll need to make some manual changes.
-
Delete the
cookie-notice.phpfile from yourconfigdirectory. -
In your
composer.jsonfile, update theduncanmcclean/cookie-noticeversion to^9.0."duncanmcclean/cookie-notice": "^9.0" -
Run
composer update duncanmcclean/cookie-notice --with-dependencies. -
Re-publish the addon's configuration file and update it as needed:
php artisan vendor:publish --tag=cookie-notice-config -
Make sure you're using both the
{{ cookie_notice:scripts }}and{{ cookie_notice }}tags in your site's layout(s):<!doctype html><html><head><!-- This should be in the <head> -->{{ cookie_notice:scripts }}</head><body><!-- And this should be near the top of the <body>. You can also do {{ cookie_notice:widget }} -->{{ cookie_notice }}</body></html> -
If you were previously calling the
window.cookieNotice.hasConsent('group_name')method, you should refactor your code to use event listeners instead. -
If you were previously loading Google Tag Manager or a Meta Pixel manually, you may now configure them in the Control Panel.
-
If you were previously overriding the
noticeview inresources/views/vendor/cookie-notice, you will need to re-implement in a custom widget. -
If you were previously listening to Cookie Notice's
consentedorrevokedevents, you should now listen for theacceptedanddeclinedevents instead.
#Upgrading from v9.x to v10.x
#Updating
In your composer.json, change the duncanmcclean/cookie-notice requirement:
- "duncanmcclean/cookie-notice": "^9.0",+ "duncanmcclean/cookie-notice": "^10.0",Then run:
composer update duncanmcclean/cookie-notice --with-dependencies#Control Panel Scripts
Cookie Notice v10 is taking advantage of Statamic's new Addon Settings feature. This means that scripts previously saved in content/cookie-notice.yaml are now saved in resources/addons/cookie-notice.yaml.
Cookie Notice will have attempted to migrate data to the new location automatically, however, if it fails, you can run the update script manually:
php please updates:run 10.0 --package=duncanmcclean/cookie-noticeIf you were listening to Cookie Notice's ScriptsSaved event, you will need to update your code to listen to Statamic's AddonSettingsSaved event instead:
- use DuncanMcClean\CookieNotice\Events\ScriptsSaved;+ use Statamic\Events\AddonSettingsSaved; - public function handle(ScriptsSaved $event)+ public function handle(AddonSettingsSaved $event)#Tailwind CSS
Cookie Notice is now using Tailwind CSS 4 to generate the widget's styles.
If you've published the widget, but haven't customized it, you should re-publish it to get the latest styles:
php artisan vendor:publish --tag=cookie-notice-widgetIf you've customized the widget and are still using Cookie Notice's classes (classes are prefixed with cn-), you should perform the following search & replace operations in your widget view:
cn-->cn:hover:cn:->cn:hover:focus:cn:->cn:focus:
If you use Tailwind CSS in your project, you may be able to get rid of the cn: prefixes altogether.